October is seriously the best month ever. Between tractor rides, corn mazes and pumpkin picking, the options for outdoor family fun are endless. But when it’s pouring rain and you find yourself stuck inside with a toddler who’s bursting at the seams with energy, it’s wise to have some seasonal craft ideas and materials ready to help pass the day. And wine.
My son Sebastian adores doing arts and crafts at any time of year, but Halloween art projects are especially fun for him. He loves gluing googly eyes on monsters and shredding rolls of toilet paper for making mummies. This month he’s crafted both of the aforementioned creatures, plus pumpkins, spiders and skeletons. We used objects we had lying around the house (cotton swabs and popsicle sticks) and purchased a few new paint colors. Not only did we make great use of a few rainy days, we also made inexpensive and absolutely adorable decorations we can put out for years to come.
Here are seven not-so-spooky crafts that are simple to make at home with your toddler this Halloween season:
Popsicle stick monster and pumpkin
Don’t toss those popsicle sticks into the trash can – wash and dry them, then use them to make these cute, customizable Halloween decorations. There is no wrong way to make these – let your imagination be your guide. Tip: Affix press-on magnets to the back of your finished decorations and stick them to the fridge!
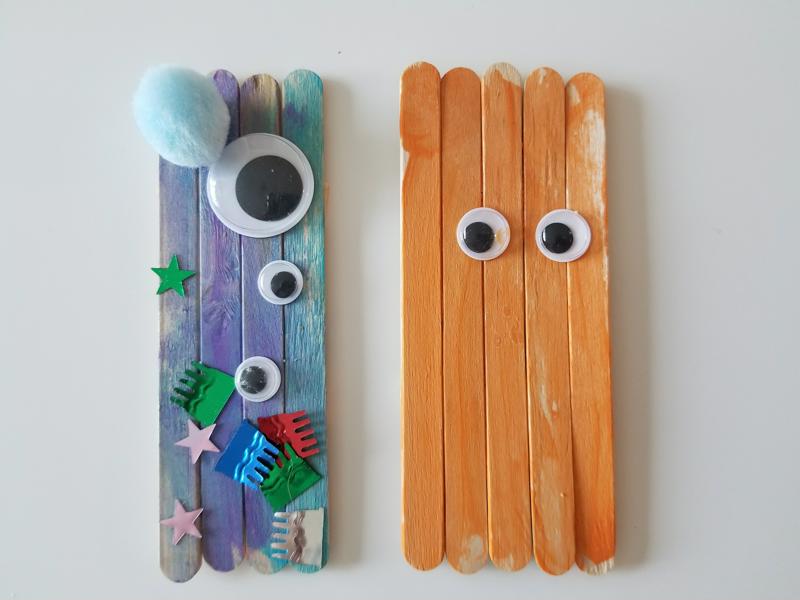 If you’re feeling creative, try making other creatures out of popsicle sticks – Frankenstein anyone?
Materials (monster):
- Popsicle sticks (at least four).
- Glue.
- Blue and purple paint.
- Paintbrush.
- Googly eyes.
- Additional decorative elements of your choice (pompons, glitter, confetti, felt, etc.).
Materials (pumpkin):
- Popsicle sticks (at least five).
- Glue.
- Orange paint.
- Paintbrush.
- Googly eyes.
Instructions (monster and pumpkin):
- Place 3-6 popsicle sticks vertically in a line on the table (long sides of the popsicle sticks should be touching).
- Break a separate popsicle stick in half.
- Spread glue on one side of each broken half and affix one half horizontally toward the top of the vertical group of sticks and the other half horizontally toward the bottom.
- Let glue dry.
- Turn the sticks over so that the broken halves are now against the table and out of sight.
- Use paint and paintbrush to cover the front of the creature.
- Let paint dry.
- Use glue to affix googly eyes and any other decorations you desire.
Toilet paper pumpkin and mummy
You’ll make your toddler’s day when you give him or her free reign to shred a roll of toilet paper! Both the pumpkin and mummy are super simple to make and can be placed on a shelf to display. These also make cute decorations for your office/desk as well as great grandparent gifts!
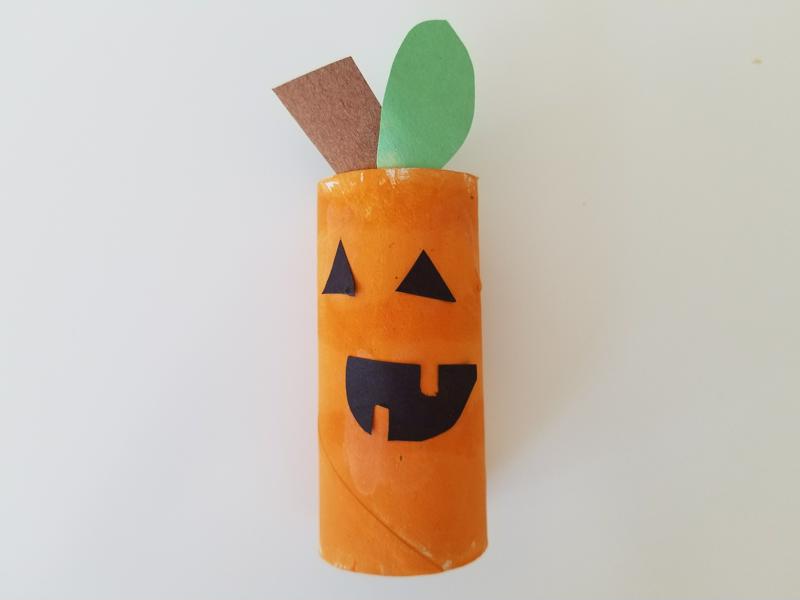 This simple Halloween craft is perfect for placing on a shelf season after season.
Materials (pumpkin):
- Empty roll of toilet paper.
- Orange paint.
- Paintbrush.
- Black, brown and green scraps of construction or tissue paper.
- Scissors.
- Glue.
Instructions (pumpkin):
- Use paintbrush to cover empty roll in orange paint.
- Let paint dry.
- Use scissors to cut mouth, eyes, stem and leaves from paper scraps.
- Use glue to affix cut paper shapes to roll.
 This mummy is my favorite craft of the bunch – simply adorable!
Materials (mummy):
- Roll of toilet paper (half used rolls are best to avoid waste).
- Black paint.
- Paintbrush.
- Scissors.
- Glue.
- Googly eyes.
Instructions (mummy):
- Remove any remaining paper from your tissue paper roll; set paper aside.
- Use paintbrush to paint roll black.
- Let paint dry.
- Use scissors to cut toilet paper into thin strips.
- Use glue to affix toilet paper strips to roll.
- Use glue to add googly eyes.
Abstract pumpkin
This super simple project requires just four materials: construction paper, scissors, glue and googly eyes. You can tape the finished product to your refrigerator, or – if you’d like to display it year after year – set it inside a picture frame to preserve its color and prevent fading and wrinkling.
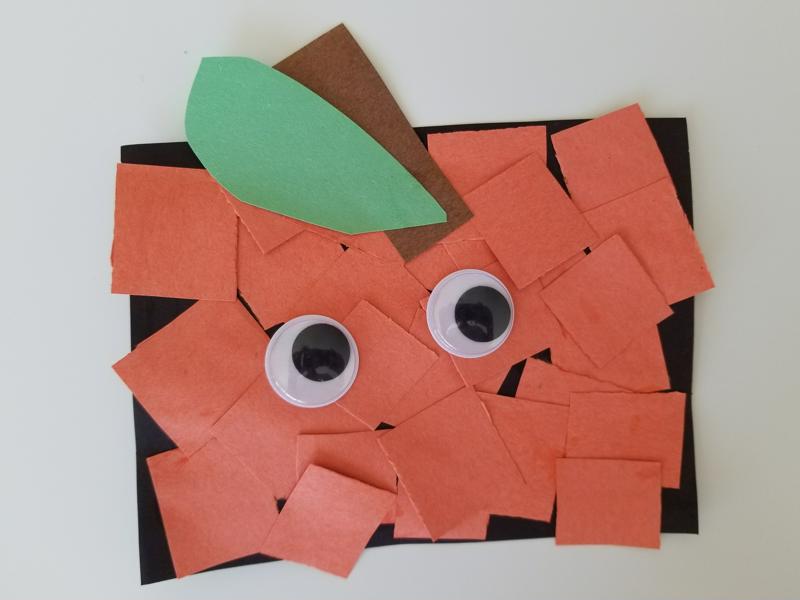 You can’t go wrong with googly eyes and glue!
Materials:
- Black construction paper.
- Orange construction paper.
- Green construction paper.
- Brown construction paper.
- Scissors.
- Glue.
- Googly eyes.
Instructions:
- Place black construction paper flat on table horizontally.
- Use scissors to cut squares from orange paper.
- Glue the orange squares to the black paper, allowing some of the black to show through, especially at the edges.
- Use scissors to cut a stem from the brown paper and a leaf from the green paper.
- Glue the stem and leaf to the top of the pumpkin.
- Use glue to affix googly eyes.
Googly eye spider
Does your toddler love singing Itsy Bitsy Spider? If so, he or she will love to get their hands dirty while creating this sorta-spooky spider! I love using handprints in artwork, as it’s nice to look back as the years pass and see how much they’ve grown in size.
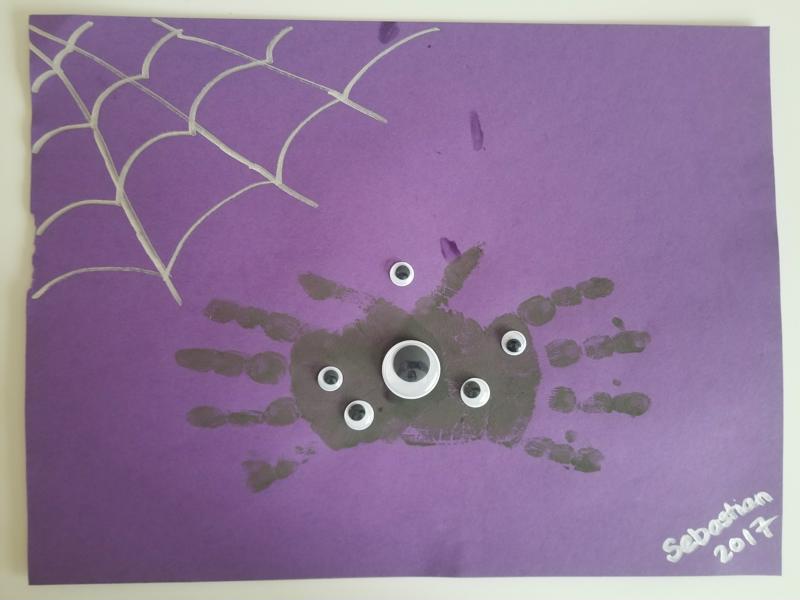 Handprint crafts are a fun way to measure your child’s growth over time.
Materials:
- Purple construction paper.
- Paper plate.
- Black fingerpaint.
- Glue.
- Googly eyes.
- Silver Sharpie marker.
Instructions:
- Place purple construction paper flat on table horizontally.
- Squeeze fingerpaint onto a paper plate and help your child cover his or her palms and fingers in it.
- Press your child’s outstretched hands onto the paper as shown in photo to create the spider shape.
- Let paint dry.
- Use glue to affix googly eyes to spider.
- Use silver Sharpie to draw a spider web.
Cotton swab skeleton
This is probably the spookiest of all the crafts, but it’s also an educational project as it helps illustrate the concept of having bones beneath the skin. I like to read a book about skeletons prior to doing this craft so that the learning is reinforced.
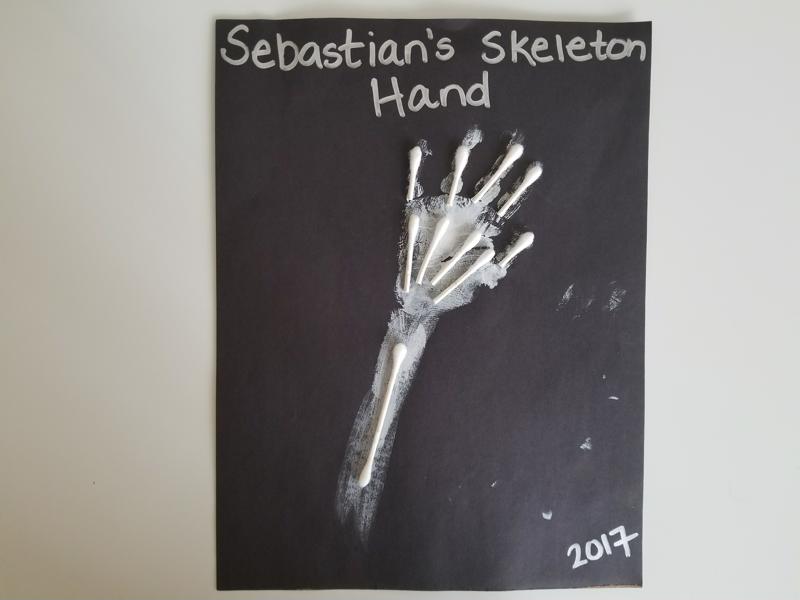 The spookiest craft of the bunch, the skeleton arm features your toddler’s handprint plus cotton swab bones.
Materials:
- Black construction paper.
- White fingerpaint.
- Paper plate.
- Scissors.
- Six cotton swabs.
- Glue.
Instructions:
- Place black construction paper on table vertically.
- Squeeze fingerpaint onto paper plate and help your child cover his or her palms, fingers and forearms in it.
- Press your child’s handprint and forearm onto the paper.
- Let paint dry.
- Use scissors to cut five of the cotton swabs in half.
- Glue cotton swabs to paper as shown in photo.
Did you try out any of these Halloween crafts? Let us know how yours turned out!
